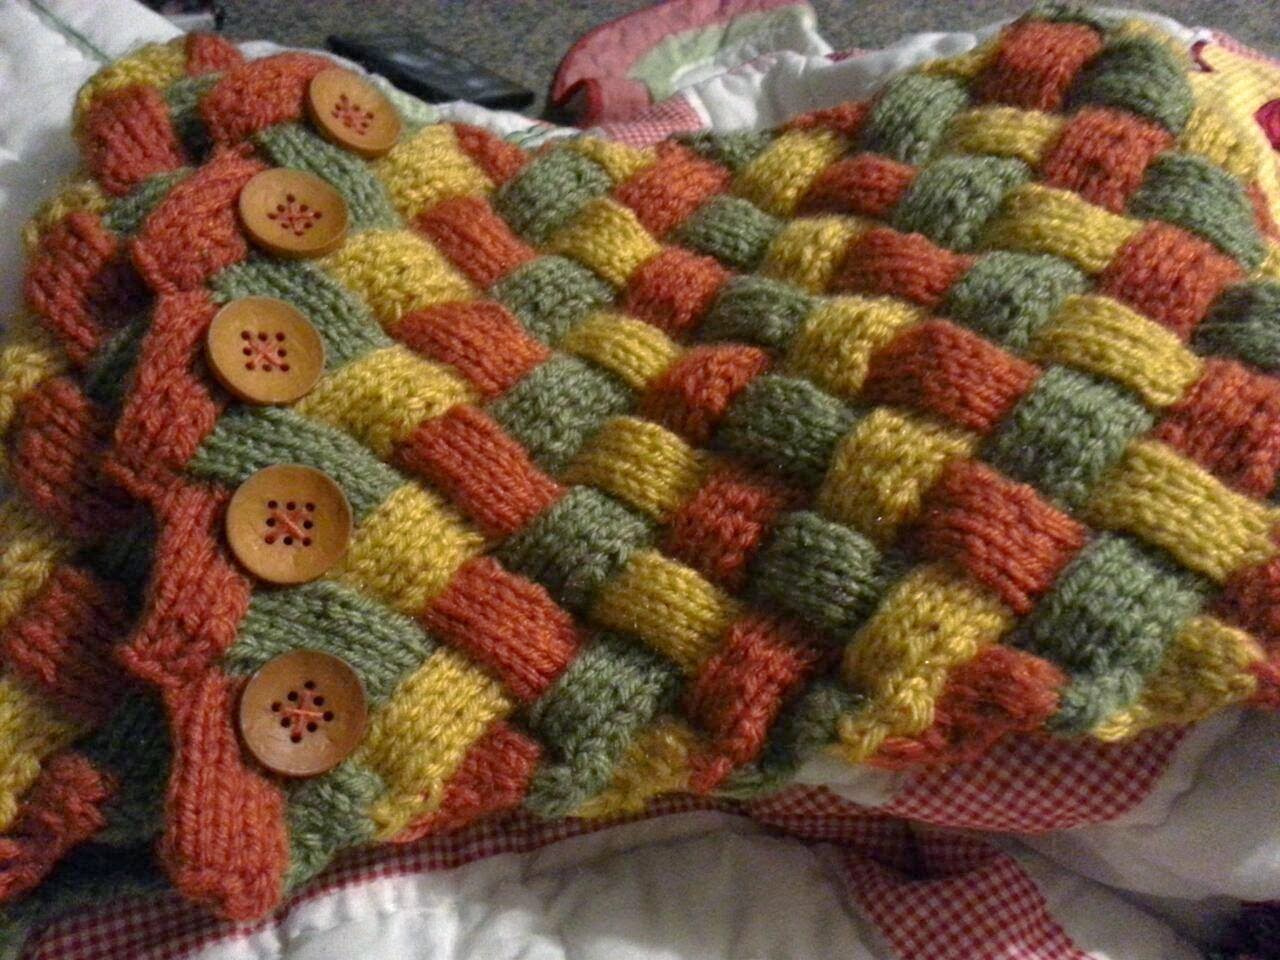
I've been seeing a lot of entrelac in my Facebook newsfeed, so I decided to try it out! I have a thing for cables and woven designs, anyway. I gotta admit, I've seen some GORGEOUS
entrelac color combos. There's everything from one solid color,
to different color blocks, to some interesting uses of variegated yarns!
And lucky for me, there seem to be quite a few How-To's online.
I started with this pdf tutorial to get the basics down. That's when I decided to just
GO FOR IT
and make my own entrelac cowl.

Necessary Skills/Abbreviations:
CO-Cast On
K-Knit
P-Purl
RS-Right Side
WS-Wrong Side
M1-Make 1
(For my purposes, I just Knit into the stitch below)
P2tog-Purl 2 together
K2tog-Knit 2 Together
SSK-Slip, Slip, Knit
(Slip first stitch as if to knit. Slip second stitch as if to knit. Pass both stitches back to left needle. Knit through back loop of both stitches.)
PUK: Pick up as if to knit
(With RS facing and yarn in back, I insert my left needle under the edge of the block.
With right needle, knit)
PUP: Pick up as if to Purl
(With WS facing and yarn in front, pick up edge of block. With right needle, Purl)
BO-Bind Off
BO-Bind Off

Materials:
I started with 1 skein of each Vanna's Choice in
Terracotta (Color 1/C1), Mustard (C2),
Terracotta (Color 1/C1), Mustard (C2),
and Dusty Green (C3). I picked out these colors back in
October because of their lovely autumn feel.
Size 5 needles.
Gauge really isn't that important.
Size 5 needles.
Gauge really isn't that important.
Each of the blocks are worked in columns of 5 stitches.
CO 25
Bottom Border:
Start with WS,
*K2, turn. P2, turn.
K3, turn, P3, turn
K4, turn, P4 turn.
K5, DON'T TURN.*
This forms the first triangle on your border.
K2 more.
Continue Pattern betwen *s. After the K5, always K2 more until you finish the 5th triangle.
Color change, Right Leaning Block Row:
Join yarn with your preferred method. I just clipped yarn and started the next row with a new color.
Left Triangle:
At the beginning of each Right Leaning Row, you will need to make a side triangle
to keep your edges mostly straight. The Left side, you will be increasing stitches (M1) and the Right Side, you will be decreasing (K2tog)
With C2, P2, turn.
K1, M1, K1. Turn. (3 stitches of C2)
P2, P2 tog. Turn.
K2, M1, K1 (4 stitches of C2) Turn.
P3, P2tog. Turn.
K3, M1, K1 (5 stitches of C2)
P4, P2 together.
Block Shaping:
PUP 5 stitches evenly along edge.
*Turn. K5. Turn.
P4, P2tog,* Turn.
Repeat between *s until you reach edge of block.
Repeat Block Shaping 3 more times.
PUP Stitches
 |
| Pick up the entire edge stitch with the L needle. |
 |
| Make sure your yarn is in front of your work. |
 |
| Purl. Repeat this step 4 times. |
 |
| You'll have a column of K Stitches facing you. This keeps the edge neater and makes it look like your contrasting color is coming from underneath . |
Right Triangle:
PUP 5. Turn.
K2, K2tog, K1. Turn.
P4. Turn.
K1, K2tog, K1. Turn
P3. Turn.
K1, K2tog. Turn.
P2. Turn.
K2 tog.
Left Leaning Block Row:
PUK 5 evenly in C3 along left edge of triangle.
Turn. P4, P2tog. Turn
K4, SSK,
*Tunrn. P5, Turn.
K4, SSK,* Turn.
Continue between *s until you reach the end of the block.
PUK 5. Turn
Continue Block Pattern to end of row, picking up 5 after each block is finished.
After Last SSK, Turn Work. Begin new Right Leaning Row with C1.
PUK Stitches:
 |
| Just like before, pick up a stitch on the left needle. |
 |
| Insert right needle as if to knit. Yarn is in back of work. |
 |
| Pull the yarn through to knit. |
 |
| After all 5 are done, it should look like this. |
Continue in pattern until garment measures approximately 24 inches in length. End with a Right Leaning Row.
Button Holes:
PUK 5 stitches, but space them so that the 5th stitch is only halfway down the block.
Turn. P4, P2 tog. Turn.
*K4, SSK, Turn.
P5, Turn*
Continue until there is 1 stitch left on the Right Leaning Block.
BO 4, SSK. BO.
Repeat Button Hole pattern until you have bound off your last stitch.
Weave in ends, and sew buttons on RS of other end.
 |
| The rows on the WS make an excellent way to weave in ends! |
No comments:
Post a Comment